
Natural Dye for your Easter Eggs
Apr 11, 2022
Dyeing and decorating Easter eggs is a holiday tradition for many. Some people don’t realize that making the dye can be just as fun as decorating the egg, though. Sure, store-bought food coloring will get the job done, but where’s the fun in that? Instead of going to the grocery store, try turning vegetables, fruits, and spices straight from your pantry or garden into natural Easter egg dye that is eco-friendly and kid-approved.
Making homemade dye is a rewarding task, and it is not as hard as it may seem. Simply follow the steps below to start your next Easter tradition.
Step 1: In a medium pot on the stove, combine one tablespoon of white vinegar per one
cup of water. For a dozen eggs, use four cups of water and four tablespoons of vinegar.
Step 2: Bring the water and vinegar to a boil and add the dye ingredients for your
desired egg color. Turn the heat down to low and let simmer for 30 minutes.
Step 3: Let the dye cool and pour through a fine-mesh strainer to remove any food
fragments.
The actual dyeing process does not change — hard boil your eggs, let them cool, and dip in the dye. You can obtain numerous hues and vibrance levels by adjusting the eggs’ duration of time spent in the dye. Do you like a more subtle look? Don’t let the eggs soak for longer than 30 minutes. Want to really make a statement? Leave the eggs in the dye overnight.
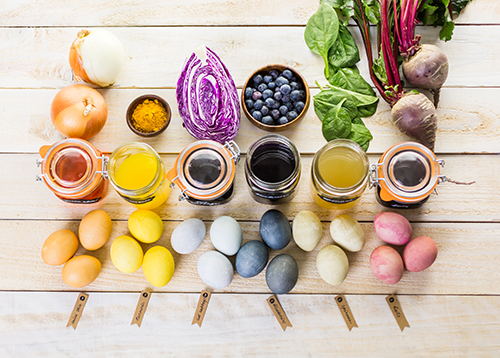
So, what ingredients will result in which colors? There are a variety of combinations and solo ingredients that you can extract color from through the boiling process listed above, but here are several of the most common:
Before you take the dye off the stove, check the color by pouring a few drops onto a white dish. If you want the dye to be darker, add more ingredients to the water and let simmer for a few minutes longer. The dye is ready when it’s a few shades darker than the color you want your eggs to be. Rub a little oil on the eggs with a soft rag or paper towel to really make them shine.
The best part about homemade dye is that many of the ingredients can be grown from your own garden! Your local Co-op is here for all of your gardening needs this spring with seeds, tools, and expert advice.
For more content like this, check out the latest issue of the Cooperator.
Making homemade dye is a rewarding task, and it is not as hard as it may seem. Simply follow the steps below to start your next Easter tradition.
Step 1: In a medium pot on the stove, combine one tablespoon of white vinegar per one
cup of water. For a dozen eggs, use four cups of water and four tablespoons of vinegar.
Step 2: Bring the water and vinegar to a boil and add the dye ingredients for your
desired egg color. Turn the heat down to low and let simmer for 30 minutes.
Step 3: Let the dye cool and pour through a fine-mesh strainer to remove any food
fragments.
The actual dyeing process does not change — hard boil your eggs, let them cool, and dip in the dye. You can obtain numerous hues and vibrance levels by adjusting the eggs’ duration of time spent in the dye. Do you like a more subtle look? Don’t let the eggs soak for longer than 30 minutes. Want to really make a statement? Leave the eggs in the dye overnight.
So, what ingredients will result in which colors? There are a variety of combinations and solo ingredients that you can extract color from through the boiling process listed above, but here are several of the most common:
- Yellow – two tablespoons of turmeric per cup of water
- Orange – one cup of yellow onion skins per cup of water
- Blue – one cup of chopped purple cabbage per cup of water
- Dark blue – one cup of blueberries per cup of water
- Green – one cup of spinach per cup of water
- Pink – one cup of chopped beets per cup of water
- Red – skins of three red onions per cup of water
Before you take the dye off the stove, check the color by pouring a few drops onto a white dish. If you want the dye to be darker, add more ingredients to the water and let simmer for a few minutes longer. The dye is ready when it’s a few shades darker than the color you want your eggs to be. Rub a little oil on the eggs with a soft rag or paper towel to really make them shine.
The best part about homemade dye is that many of the ingredients can be grown from your own garden! Your local Co-op is here for all of your gardening needs this spring with seeds, tools, and expert advice.
For more content like this, check out the latest issue of the Cooperator.